Getting into solar energy can feel like a big leap, but it doesn't have to be! Let's break it down into bite-sized pieces. First off, understanding the basics is key. You don't need to be a scientist to get started; just a bit of curiosity and the right tools.
At its core, a DIY solar energy system captures sunlight and converts it into electricity. All you need are a few essential components: solar panels, an inverter, batteries, and a charge controller. Each piece works together to transform the sunlight into usable power. It’s like putting together a puzzle, and guess what? You get to create something amazing!
Curious how to get started? Here’s a simple plan:
As you dive in to learn how to build a DIY solar energy system, remember to take it step by step. Enjoy the process and don’t hesitate to ask questions or look for advice online. You'll be amazed at how empowering it feels to harness the sun’s power for your own needs!
Choose the Right Solar Panels
Choosing the right solar panels is a big step when you’re figuring out how to build a DIY solar energy system. With so many options out there, it can feel a bit overwhelming, but don’t worry! I’ll break it down for you.
First off, think about the type of solar panel you want. There are generally three types: monocrystalline, polycrystalline, and thin film. Monocrystalline panels are super efficient and take up less space, making them great if you’re short on room. Polycrystalline panels are a bit cheaper but may require more space since they’re slightly less efficient. Thin film panels are lightweight and flexible, but they’re not as efficient either.
Next, consider the wattage. This is basically how much power a panel can produce. If you aim to power a whole house, you’ll need a higher wattage. If you just want to charge some batteries or run small appliances, lower wattage panels may do the trick. You can also mix and match wattages based on your needs.
Don’t forget to check the warranty. A good warranty usually means the manufacturer stands behind their product. Look for panels with at least a 25-year warranty. That shows you they’re built to last.
Finally, keep an eye on reviews. Hearing from other DIYers can help you determine the best options. Look for panels that folks rave about for reliability and ease of installation. This research will help you feel confident about your choice when you’re ready to jump into how to build a DIY solar energy system!
Essential Tools for Your Project
When you're ready to take on the challenge of building your own solar energy system, having the right tools makes all the difference. These essentials will help you get the job done quickly and effectively. Let’s dig into what you really need.
First up, a good multimeter. This handy tool lets you measure voltage, current, and resistance. It’s super important for checking your system’s performance and troubleshooting any issues. You’ll want one that’s easy to read and reliable because you’ll lean on it quite a bit as you figure out how to build a DIY solar energy system.
Next, don't skip on quality wire cutters and strippers. You’ll be working with different wires for connections and panels. A decent pair will save you time and frustration, letting you handle wires without any hassle. You need something that delivers a clean cut, ensuring good connections without damaging the material.
Lastly, a soldering iron can be a game-changer. If you're connecting solar panels or making custom connections, soldering will give you solid joints that hold up over time. Choose one with adjustable temperature settings, so you can use it for various tasks without burning anything.
With these essential tools in your arsenal, you're all set to tackle your solar project. Jumping into how to build a DIY solar energy system can be exciting, especially when you’re organized and prepared! Happy building!
Step by Step Installation Guide
Getting started with your DIY solar energy system is super exciting, and I promise it’s easier than you think. Here’s a straightforward step-by-step installation guide to help you along the way! Trust me, you’ll be amazed at what you can do.
Step 1: Gather Your Materials
Make sure you have everything you need before you start. It’ll save you tons of time running around.
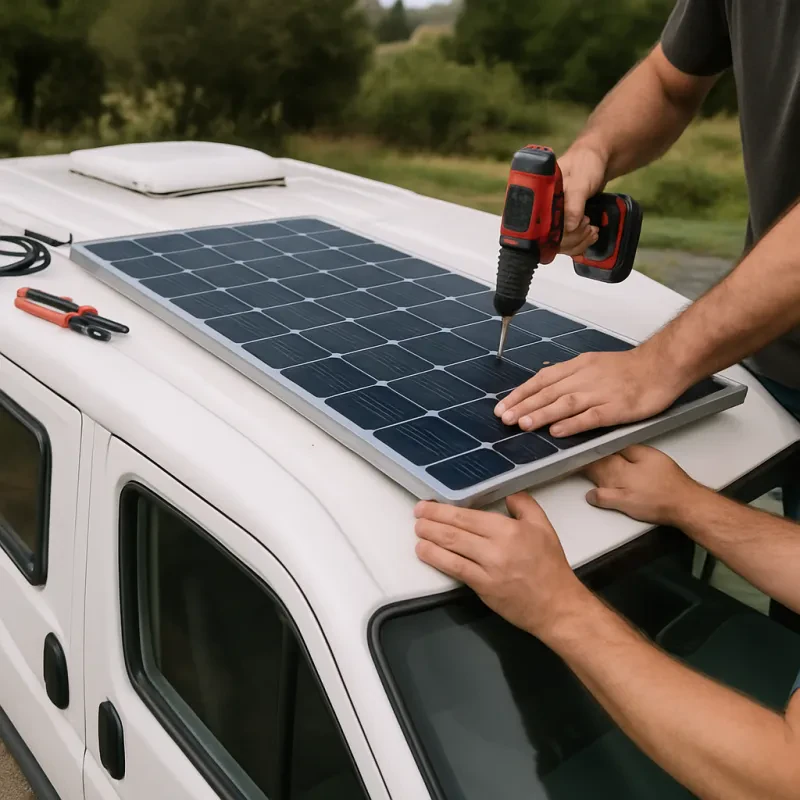
Step 2: Set Up the Solar Panels
Find a sunny spot for your panels. Use the mounting brackets to secure them on your roof or in your yard. Angle them toward the sun for maximum efficiency. Just make sure they’re stable and won’t budge in strong winds.
Step 3: Connect Everything
Now it's time to wire up. Connect the solar panels to the charge controller first. This step is crucial because it protects your batteries from overcharging. Next, link the charge controller to your battery bank. Finally, hook up the inverter to your battery; this will convert that stored energy into usable power for your home. If you’re not sure about connections, a quick online video can be a lifesaver!
Step 4: Test Your System
Once everything is connected, it’s time to test it out. Check to see if your inverter is outputting power. If you see that sweet green light, you’re good to go! This whole setup is how to build a DIY solar energy system that you can count on.